
Bucket Gardens: Building a Raised Garden Bed
Raised garden beds can be an easy and convenient way to grow just about anything in a tight spot. In a small space, raised beds and container gardens can provide plenty of veggie square footage and are an easy return on your investment. When you bring a little DIY ingenuity into the mix, like one savvy McCoy’s customer did, then you can bring your raised bed container garden to life with some good-looking McCoy’s buckets, a little wood, some simple tools, and just an afternoon.
Why Plant in a Raised Garden Bed?
Raised garden beds and container gardening in general can offer great benefits. When you add in buckets, you also get durable, reusable, and low-cost materials to create your garden.
- Ditch the stoop: Raised garden beds allow you to save your aching back when it comes to planting, weeding, tending, and harvesting the fruits of your garden labor.
- Keep it simple: Methods like “square-foot gardening” encourage you to use a small space (say, the size of a five-gallon bucket) to plant your vegetables to maximize your garden yield. It’s easy to keep track of when you plant if you do it one bucket at a time.
- Control the dirt: Instead of using existing yard soil, you can fill each bucket with exactly the type of soil, drainage, and fertilizer each plant needs.
- Outsmart the weeds and pests: Weeds and hungry varmints can creep into even the most well-tended gardens. However with raised gardens and especially a raised garden bed made of buckets, you can limit the potential for those groundhogs, rabbits, and other sneaky veggie stealers to wreak havoc. You can even position it in a spot that wouldn’t normally be plant friendly (like a back porch) but does keep your veg away from nosy deer, dogs, or squirrels.
- Garden in a small (or rented) space: Even if you don’t have a great yard for a garden (too small or oddly situated) you can create this handy raised garden bed with buckets for a solution you can also move or store out of season. It will even work situated on top of concrete or rocks! No yard? No problem!
Supplies for Your Own Bucket Raised Garden Bed
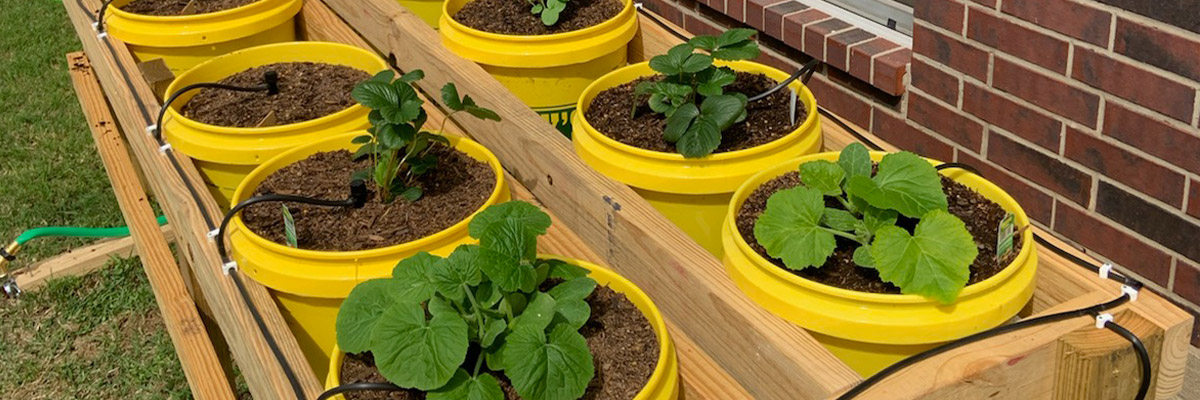
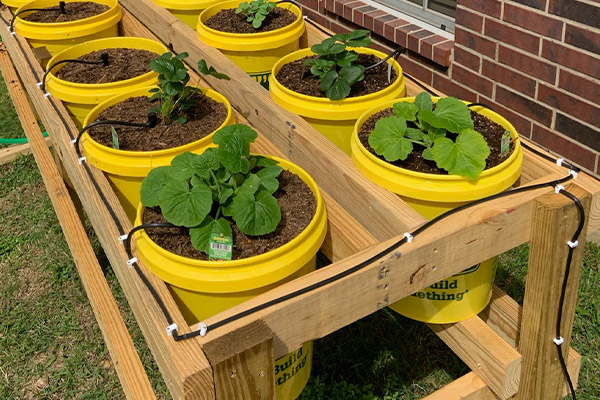
What we love about this customer’s raised garden bed with buckets, is it uses basic materials– available at your local McCoy’s– to create a practical raised garden bed that can be used year after year and can be adapted to four, six, or eight buckets.
Note: If you’re worried about using pressure treated wood for your garden bed, you can find more information in this article.
- Materials:
- 12 McCoy's yellow buckets
- Potting soil (choose potting soil or raised bed soil, not topsoil)
- Drainage (mulch or gravel-type rocks)
- Around 56 Galvanized wood screws
- Garden plants (grow from seeds, available at McCoy’s, or add your favorite veggies or flowers)
- Tools:
- Drill and drill bits
- Saw to cut wood to dimensions
How to Construct a Raised Garden Bed with Buckets
- Make drainage holes in the buckets: Prepare your buckets by turning them over on a stable surface. Use a drill and a ½-inch drill bit to drill drainage holes. There are two places you can add holes: on the bottom or the sides.
- If you want the side drainage: Add one or two drainage holes approximately one inch up the side of each bucket (2-3 holes per bucket). Be careful not to press down on the side too hard to avoid bending or cracking the bucket. Side holes allow a small amount of water to remain in the bottom of the bucket in reserve, but not to swamp your plants.
- Alternatively, you can also choose to add drainage holes in the very bottom of each bucket. Drill one in the center and three around the bottom edge.
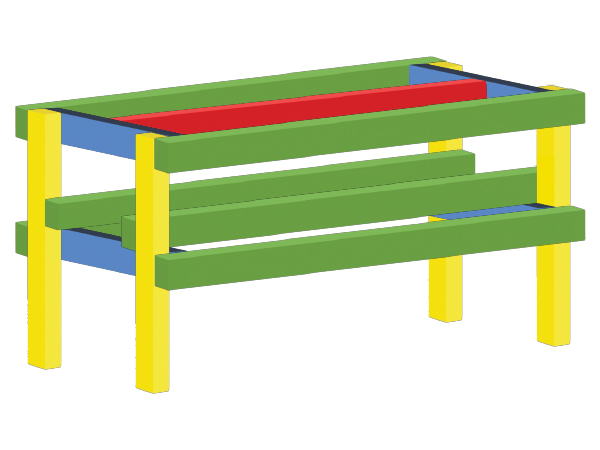
- Cut your lumber: Your bed will consist of two rows of six buckets each. The bed “frame” will hold each bucket at the top lip and the bottom of each bucket. You will need 13 (2x4x8) treated Southern Yellow Pine boards cut into different dimensions. Use our helpful color-coded graphic for the cut list.
- Cut list:
- Green (six, 76”): Grab six of your boards and cut each so they measure 76 inches long.
- Red (two, 72”): Cut two boards slightly smaller than the green at 72 inches long, each.
- Blue (five, 28”): From two boards, cut one into three, 28-inch sections and from the second, cut two lengths the same 28 inches.
- Yellow (six, 36”): From the three remaining pieces of lumber, cut two 36-inch-long sections from each eight-foot-long board.
- Construct the raised bed frame: Assemble the boards using the illustration as a guide. Use galvanized screws at each point to secure the boards. Use the prepared (empty) buckets as a reference as you put together the boards, ensuring that the spaces are big enough to comfortably fit each bucket, and the board below is at the correct height to support the bucket from below. (Do not make the bucket holes too snug; you’ll want to allow for any expansion from heat over time. You should be able to insert and remove the buckets from the frame as needed.) Using two galvanized screws at each point where the boards connect (you will need a minimum of 56), screw together the cut pieces:
- Start with the legs (yellow) and screw to the two stabilizer pieces (blue) at each end as well as one (blue) in the center. The ends of the blue should overlap with the yellow. The bottom blue boards should be 10.25 inches up from the bottom of the bed legs. The top blue should be flush with the top of the yellow.
- Next, add in the two side boards (green) on each side of the bed in line with the blue. Each blue board should butt against the green, and each green should be flush with the side of the yellow.
- Lastly, use a bucket to gauge where your inner rails (red) on the interior top should be to provide stability under the lip of the bucket on either side. Use your last two green boards as the seat for your buckets. Attach them to each bottom blue board with screws or even a deck hanger.
- Add drainage material and soil: You can add drainage material to the bottom of each bucket in the form of a few inches of mulch, small gravel, or other materials including broken pottery or broken sticks. This prevents the soil and roots from compacting all the way to the bottom of each pot. Then mostly fill each with potting soil after you’ve seated them in the bed frame.
- Add plants to each bucket: Add just one plant or one or a few seeds to each bucket. Tomatoes, peppers, bush beans, or bush-variety squash are all good options for containers. You can grow vine plants in a raised bed but be prepared for them to spread down to the ground, which may negate some of the raised bed benefits. You can also plant herbs, lettuce, or even carrots, beets, and other root vegetables in your buckets. Water each plant well.
- Add irrigation drip line (optional): You can always water your garden manually, but if you want a bit of a hands-free upgrade, try adding a simple drip line watering system to give even watering to each bucket. You can operate this drip line either manually, or via a timer.
Get it All Together at McCoy's
Our helpful McCoy’s staff can help you make sure you have the right supplies for your bucket garden, or any other home project you have up your sleeve. If you want to go big and make a 12-bucket version like our customer created, we can help you plan the right length lumber and make sure you have all the right materials. After all, when our customers get great ideas, that makes us really happy, too! Make sure you show off your project by sharing on social media and tagging us.