


How to Install Pavers Perfectly in a Weekend
Adding a concrete paver walkway or patio can not only add great curb appeal to your home, but it’s also an economical way to create some outdoor living space. Concrete pavers come in a range of colors and sizes, and they’re ideal for a DIY project you can get done in a weekend or two. If you don’t know how to install pavers, don’t worry – it’s a straightforward process that nearly anyone can handle.
Why Choose Concrete Pavers
Not only are concrete pavers affordable, but they come in a range of stylish colors, shapes, and sizes. While “concrete” pavers are sometimes referred to as “cement,” that’s just one component of concrete pavers. Their simple ingredients also include sand, water, and gravel (or other aggregates). Additional color is included to truly customize concrete pavers for nearly any use.
There are also very practical reasons to choose concrete pavers, like their durability and strength. Due to their manufacturing process, where the concrete mix is poured into molds and hardened, they can withstand a great deal of pressure. For example, concrete pavers can withstand 8,000 pounds per square inch of pressure, whereas standard poured concrete can only withstand up to 3,000 pounds per square inch. This means your paver patio can withstand a bit more than “normal” foot traffic. You could make a paver driveway, an outdoor kitchen, or a place to work on your favorite classic car restoration project.
Concrete pavers are also inexpensive and easy to replace – if one gets damaged after installation, you can easily swap in a new paver. Because you can adjust pavers to fit odd spaces, even on slopes or uneven ground, they are an ideal solution for almost any terrain.
They’re a great choice to hold up under varying weather conditions, since their shape allows you to lay pavers with spaces between them to absorb precipitation, runoff, or allow for natural expansion or contraction in extreme heat or cold. Some concrete pavers are even made with additional ingredients to make them more permeable, and able to pass water more easily in the heaviest of rains. You can also install pavers with room between them to grow grass, moss, or even low-growing plants like herbs, to create a garden-like effect or to provide color and additional filtering of precipitation.
Styles of Concrete Pavers
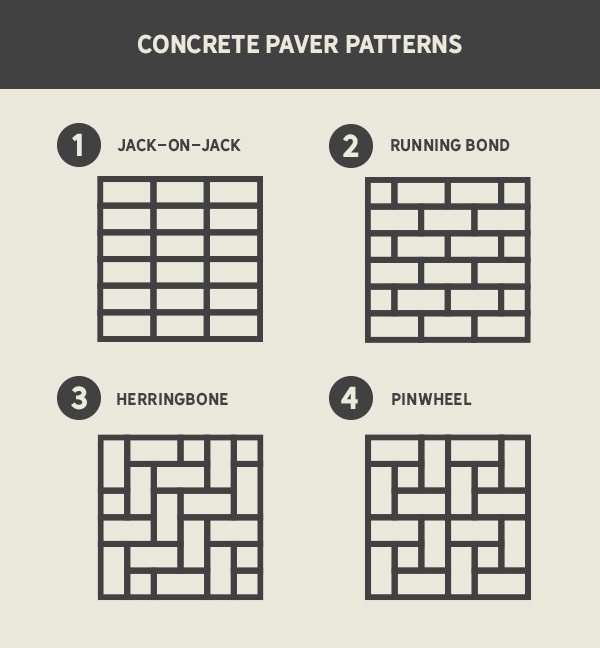
There are many styles of concrete pavers you can install, including those with unique shapes that can provide an architectural interest or even accessibility for wheelchair users to your walkway or patio space. You can even create designs with layouts of simple square or rectangular pavers, such as:
- Jack-on-jack: Laying rectangular or square pavers end to end in straight rows, this is also called “stacked bond.”
- Running bond: Also called “stretcher bond,” you might recognize this pattern in brick walls with its’ simple “one-over-two” pattern.
- Herringbone: This classic angled shape creates a zig-zag pattern with 90-degree angled stones.
- Pinwheel: Appearing to “turn” around a central stone, this pattern would require some stones to be cut down to fit inside four stones set in flower-like groups.
Quick Paver Calculator
Use a quick calculation to get a rough estimate of how many pavers you will need for your project.
Note: This is for a project with no space between your pavers
*A buffer of 10% will be applied to this calcuation.
How to Lay Concrete Pavers
Step 1: Mark the desired area for your patio or walkway.
Step 2: Dig turf and earth to a consistent 8-9-inches deep. (Be sure to add a slope away to allow rain to run off away from your home.)
Step 3: Add a gravel base 6-inches deep. Then compact the gravel using a tamping tool or a compacting tool.
Step 4: Add any desired paver edging around the perimeter of the area and add landscape fabric across the paver space to prevent weeds (optional).
Step 5: Add a 1-inch layer of bedding sand and rake to make it as even as possible. Finish by smoothing the sand out using PVC/rebar and a 2x4 or use a synthetic paver base (but not natural material).
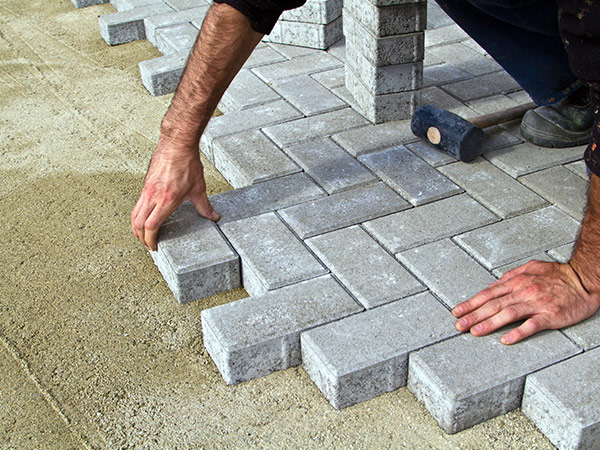
Step 6: If you are using a unique pattern, draw the pattern on graph paper first. Place your pavers in your desired pattern. Use a mallet to tap each paver into place, and a level to ensure each stone is properly level before installing the next paver. If your plan calls for space between pavers, measure the space as you lay each paver to ensure consistency. The easiest way to ensure consistent spacing is to use a spacer. Your spacer can be anything from a pencil to a block of wood, depending on the amount of space you desire.
Step 7: When you’re done, fill in the areas around the pavers with polymeric sand using a broom or hand brush.
Step 8: Use a hose to lightly water the polymeric sand to activate it. Wait about an hour before walking on the surface or otherwise using it.
How to Maintain Concrete Pavers
Maintaining concrete pavers is a simple process. If you’ve installed your pavers carefully, using the recommended process, they shouldn’t shift or settle enough to become uneven. But if they do happen to move or break, you can remove a paver (or even several) and repeat the proper process to reset them in a level fashion.
If you need to clear off pavers, a simple hose or broom can do the trick. To clean pavers from bad spills, use a power washer and an outdoor-approved cleaner that won’t harm grass or nearby landscaping. Every few years, you may need to replenish the sand between pavers, to allow for any loss due to erosion. You can also use a specially designed sealant to seal your concrete pavers to prevent any staining.
McCoy's Has All You Need for Curb Appeal
To get plenty of expert advice on installing concrete pavers, come to your nearby McCoy’s for help getting started. We can assist you in picking out all the tools you’ll need, from the pavers themselves to everything else that will make your project a success.
