
9 Tips for a No-Fail Ceiling Fan Installation
Got an outdated fan in your living room, your kitchen, or maybe on your porch you look up at (or try not to look at!) and think, "I've got to get rid of that thing?" Now's the time. Replacing a ceiling fan is a quick and easy project that instantly updates any room.
That said, it's a bit more complicated to install a fan where there is simply an overhead light fixture. It's definitely worth getting in a pro if you want a ceiling fan where there's no existing fixture.
But, if you've already got a fan there, the housing and mount already exist and are ready to use. One note, though: If you're replacing a ceiling fan that doesn't work, you'll need to make sure the wiring leading to the fan is in good shape.
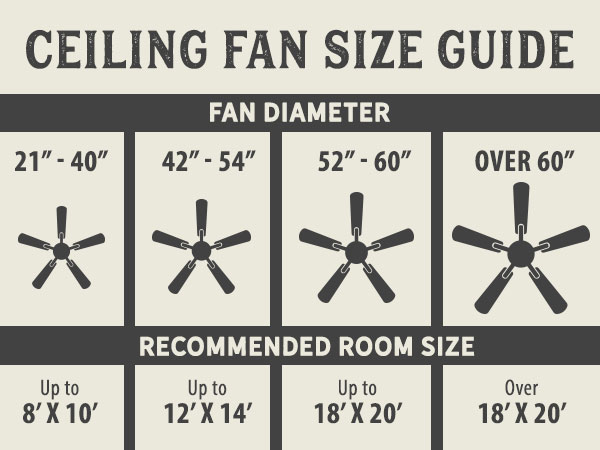
When selecting a new fan, you'll need to consider not just the style but also the correct diameter for the size of the room. Check out this handy guide for the right diameter to use in your space.
When installed, the fan blade tips should be at least 30 inches from the walls and any obstructions like other fans or chandeliers. The bottom edges of the blades should be at least seven feet above the floor.
Once you select a fan, check the included instructions for any additional requirements for blade clearance or ceiling height. Or, drop by your local McCoy's. The friendly folks there will be happy to help you select the fan that's right for you.
Tip 1: Get the Proper Tools
A successful project always starts with being prepared with the right tools. For a ceiling fan replacement, you will need screwdrivers, a voltage tester, wire cutters and wire caps. Make sure you grab a sturdy ladder to stand on. It will be extra helpful if your ladder has a wide top or a shelf that can hold screws and tools, then you won't have to worry about climbing up and down too much.
Tip 2: Recruit a Friend
While you may be tempted to try and tackle this project on your own, having an assistant around will make the job easier and much safer. Your assistant can help you by grabbing the old fan, holding the new ceiling fan in place while you screw it in, and picking up dropped screws (yes, plan on that happening)!
Tip 3: Power Off with the Three-Step Method
With the light and fan in the "on" position, turn off the power at the breaker. If the fan is on a wall switch, flick the light switch off and then on again to be sure the power is out. Then, use a voltage tester to make sure the power to the fixture is truly off. It's an extra step, but it doesn't hurt to be doubly sure! If you're unsure or you have questions about this step, please contact an electrician.
Tip 4: Read the Instructions
You might want to wing it, especially if you've installed a ceiling fan before. While most ceiling fans are fairly easy to install, they are all a bit different. Instructions for downrod fans are a bit more complicated and may include support cables.
So, be sure to read the instructions for your ceiling fan thoroughly. It will help keep you from looking for tools or parts halfway through the project. You'll also know you are following the steps for this particular model in the correct order.
Tip 5: Remove with Care
After you remove the existing fan, make sure the electrical box is still firmly fastened to the ceiling joist. You don't want to get all the way through the install only to find out you have a wobble! If the existing fan is still in good condition but just not your style, donate it or give it away if possible.
Tip 6: Identify the Wiring
If the existing wiring at the location is dual-switch wiring — one switch that controls the fan and a separate switch that controls the light — label the fan wires so you'll know which ones should go to the new fan and which ones should go to the light.
If your electrical box has wiring for separate fan and light switches, but you selected a new fan without a light, trim off the bare portions of the wires for the light. Secure wire connectors to the ends of wires and wrap them with electrical tape. Get professional help from an electrician if you don't know how to do this.
Tip 7: Determine the Direction
Many new fans come with reversible blades, which makes it easy to update the fixture's look. Just make sure all of yours are facing the same way as you install them.
Tip 8: Double-Check the Wiring
Before you hook up the motor assembly, double- or triple-check that all the electrical wires have been securely fastened with wire caps. Secure wire caps will prevent any wires from slipping out and becoming a fire hazard.
Tip 9: Tighten Equally
Ensure your ceiling fan is in balance by tightening all the screws that secure the blades to the blade brackets, the brackets to the fan motor, and the mounting bracket to the electrical box. Make sure the electrical box is securely fastened to the ceiling joist or hanger bar (see tip 5!) If your fan still wobbles, you may need a balancing kit.
Sit Back and Enjoy the Breeze
By using these ceiling fan tips and tricks, you'll be prepared to tackle a ceiling fan installation and enjoy a cool breeze. Ask an experienced electrician for assistance if you run into any issues or have questions. Stop by your local McCoy's for inspiration and knowledgeable staff who've seen just about everything! It's an excellent resource for accessories like light bulbs, pull chains and knobs, and replacement fan blades, too.
Got an outdated fan in your living room, your kitchen, or maybe on your porch you look up at (or try not to look at!) and think, "I've got to get rid of that thing?" Now's the time. Replacing a ceiling fan is a quick and easy project that instantly updates any room.
That said, it's a bit more complicated to install a fan where there is simply an overhead light fixture. It's definitely worth getting in a pro if you want a ceiling fan where there's no existing fixture.
But, if you've already got a fan there, the housing and mount already exist and are ready to use. One note, though: If you're replacing a ceiling fan that doesn't work, you'll need to make sure the wiring leading to the fan is in good shape.
When selecting a new fan, you'll need to consider not just the style but also the correct diameter for the size of the room. Check out this handy guide for the right diameter to use in your space.

When installed, the fan blade tips should be at least 30 inches from the walls and any obstructions like other fans or chandeliers. The bottom edges of the blades should be at least seven feet above the floor.
Once you select a fan, check the included instructions for any additional requirements for blade clearance or ceiling height. Or, drop by your local McCoy's. The friendly folks there will be happy to help you select the fan that's right for you.
Tip 1: Get the Proper Tools
A successful project always starts with being prepared with the right tools. For a ceiling fan replacement, you will need screwdrivers, a voltage tester, wire cutters and wire caps. Make sure you grab a sturdy ladder to stand on. It will be extra helpful if your ladder has a wide top or a shelf that can hold screws and tools, then you won't have to worry about climbing up and down too much.
Tip 2: Recruit a Friend
While you may be tempted to try and tackle this project on your own, having an assistant around will make the job easier and much safer. Your assistant can help you by grabbing the old fan, holding the new ceiling fan in place while you screw it in, and picking up dropped screws (yes, plan on that happening)!
Tip 3: Power Off with the Three-Step Method
With the light and fan in the "on" position, turn off the power at the breaker. If the fan is on a wall switch, flick the light switch off and then on again to be sure the power is out. Then, use a voltage tester to make sure the power to the fixture is truly off. It's an extra step, but it doesn't hurt to be doubly sure! If you're unsure or you have questions about this step, please contact an electrician.
Tip 4: Read the Instructions
You might want to wing it, especially if you've installed a ceiling fan before. While most ceiling fans are fairly easy to install, they are all a bit different. Instructions for downrod fans are a bit more complicated and may include support cables.
So, be sure to read the instructions for your ceiling fan thoroughly. It will help keep you from looking for tools or parts halfway through the project. You'll also know you are following the steps for this particular model in the correct order.
Tip 5: Remove with Care
After you remove the existing fan, make sure the electrical box is still firmly fastened to the ceiling joist. You don't want to get all the way through the install only to find out you have a wobble! If the existing fan is still in good condition but just not your style, donate it or give it away if possible.
Tip 6: Identify the Wiring
If the existing wiring at the location is dual-switch wiring — one switch that controls the fan and a separate switch that controls the light — label the fan wires so you'll know which ones should go to the new fan and which ones should go to the light.
If your electrical box has wiring for separate fan and light switches, but you selected a new fan without a light, trim off the bare portions of the wires for the light. Secure wire connectors to the ends of wires and wrap them with electrical tape. Get professional help from an electrician if you don't know how to do this.
Tip 7: Determine the Direction
Many new fans come with reversible blades, which makes it easy to update the fixture's look. Just make sure all of yours are facing the same way as you install them.
Tip 8: Double-Check the Wiring
Before you hook up the motor assembly, double- or triple-check that all the electrical wires have been securely fastened with wire caps. Secure wire caps will prevent any wires from slipping out and becoming a fire hazard.
Tip 9: Tighten Equally
Ensure your ceiling fan is in balance by tightening all the screws that secure the blades to the blade brackets, the brackets to the fan motor, and the mounting bracket to the electrical box. Make sure the electrical box is securely fastened to the ceiling joist or hanger bar (see tip 5!) If your fan still wobbles, you may need a balancing kit.
Sit Back and Enjoy the Breeze
By using these ceiling fan tips and tricks, you'll be prepared to tackle a ceiling fan installation and enjoy a cool breeze. Ask an experienced electrician for assistance if you run into any issues or have questions. Stop by your local McCoy's for inspiration and knowledgeable staff who've seen just about everything! It's an excellent resource for accessories like light bulbs, pull chains and knobs, and replacement fan blades, too.

